Try ABCYa's Animate to Integrate Science and Technology
Try ABCYa's Animate to Integrate Science and Technology
Try ABCYa's Animate to Integrate Science and Technology
My all-time favorite technology tool to use is ABCYa's Animate. It is open ended so it can be used for nearly any topic and subject area. I'm going to focus on science in this post because that is how I use this tool with my students. If you're working on laptop or desktop computers, the main ABCYa website has this tool for free, but if you're on an iPad, they have an app that costs $4.99 (affiliate link from iTunes: click on the picture below to be taken to the download page). In my opinion it is totally worth 5 bucks to have this multi-purpose tool.
How does Animate work? VIS- Very Important Stuff
Luckily, the user interface is something that should make your students very comfortable, but there are a few things that I will point out that will make their final products awesome. ABCYa did make a tutorial for the program so I recommend starting there.
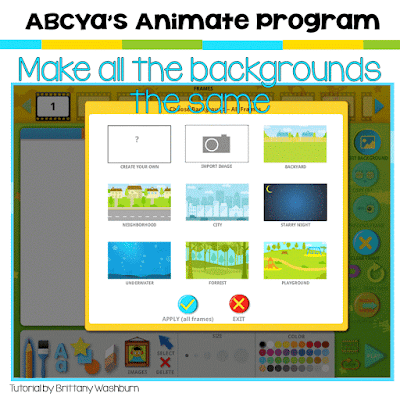
Make all the backgrounds the same
To make a fantastic looking animation, make all of the backgrounds the same. There is a button that says "edit background" for this. The cool thing is that you can draw, import, or choose from one of the options provided. For this particular tutorial I am doing the phases of the moon, so the "starry night" background is perfect. I chose to apply it to all frames.
Use text, shapes, drawings, and images
The more of the tool bar that is used, the better that the slides will come out. That being said, including too much can definitely be overkill. Instruct students to consider their audience when choosing how much stuff to include on each slide. It needs to be readable.
The tool bar should be familiar enough to students. On the left side they choose the tool (pencil, paint, text, shapes) and then options will appear to the right for the size and color. There is an eraser tool as well as a delete button for deleting whole shapes, drawings, text, etc.
Copy Frame is your new best friend
That is what I tell my students, anyway. Show them this button and tell them how important it is to save time. Oh, I should mention that there is no way to save one of these and keep working on it later. It is a one-sitting tool so efficiency is important.
When you copy a frame the entire thing is then available on the next frame. I used this to help me draw out the moon. I didn't have to make a new circle each time.
Preview your work with the play button
As students work through their animation, it is helpful to be able to see the progress. At any time, they can press the play button to preview the animation. There is also the ability to choose the speed (slow, medium, fast) and whether or not to play the animation over and over in a loop.When the animation is finished look for the orange circle
I'm so grateful that they made the save button a different color. Direct students to click "export as .gif" and choose a size compatible with your wifi connection. I usually choose the smallest possible version.
Now what? I have my students upload their .gif files onto a padlet, which is my favorite free tool for publishing and turning in work. If you have access to Edmodo, Google Classroom, or some other education management system that should be the one you use, but padlet is a great option for everyone else. Padlet allows comments so I have my students leave feedback for each other's animations.Science ideas for animations
Is your mind spinning with the possibilities yet? This tool is awesome for any processes, which is why I nearly always use it at the end of science units as a way for students to show me what they know.
I'm going off of the NC science units for these topics, so if you follow a different set of standards just look for the topics your students learn.
Sometimes I also use this tool for vocabulary. If a term has a process or would work particularly well to explain across multiple frames then I have students animate it and share it with me. I consider this "hands on" even though it is technology based because it really helps my students develop a deeper understanding of the processes. I would also consider this a STEM activity because it is open ended and cross-cutting the subject areas.
We are a standards based grading school, so the scale is 1-4 with 4 being above and beyond and 1 being unable to understand/complete.
Thanks for reading this post. If you're interested in using technology tools like this more in your classroom, check out my Digital STEM Challenges resource.


Post a Comment